
 CCP-EM Tutorials
2. Dock the AlphaFold model#
We’ll use the AlphaFold model as a starting model and first we need to fit this in the map.
We will use an EMPlacement job to perform a fast 6D search (rotation and translation) to find the locations and orientations that fit the map best.
The EMPlacement job runs a global search with the whole map for the best fit. There is a related emplace_local job that performs a local search, but we will use the global search here.
From the NEW JOB tab, find EMPlacement in the Atomic Model Fit section and enter the following (leaving the other parameters with the default settings):
JOB: EMPlacement
Model to dock:: Fetch/jobXXX/AF-P00722-F1-model_v6.cif
NOTE: In this tutorial, where we have put “jobXXX” you will need to replace this with the number of the correct job in your project, which might not always be the same if you run any extra jobs. Usually, Doppio will suggest appropriate input files for you and you will just need to select the right one.
DEFAULT: Estimate composition from model:: No
FASTA Sequence:: Fetch/jobXXX/P00722.fasta
DISABLED: Composition model::
DEFAULT: Fixed model::
Input half map 1:: Refine3D/job029/run_half1_class001_unfil.mrc
Input half map 2:: Refine3D/job029/run_half2_class001_unfil.mrc
Best resolution:: 2.9
DEFAULT: Point group symmetry::
DEFAULT: Estimated RMSD:: 1.2

HEADER: Queue submission options
DEFAULT: Submit to queue?:: No
DISABLED: Queue name:: openmpi
DISABLED: Queue submit command:: qsub
DISABLED: Standard submission script::
DISABLED: Minimum dedicated cores per node::
Be careful to ensure that you use run_half2_class001_unfil.mrc instead of repeating run_half1_class001_unfil.mrc for Input half map 2.
Click RUN to start the job. The job will take a few minutes to complete.
Click on the RESULTS tab, here you should be able to see the AlphaFold model successfully docked into the 3D map.
2.1. Inspect EMPlacement results#
You can assess the quality of the fit visually using the 3D viewer i.e. does the model fit the contours of the map region it is docked in, and quantitatively by the mapLLG score.
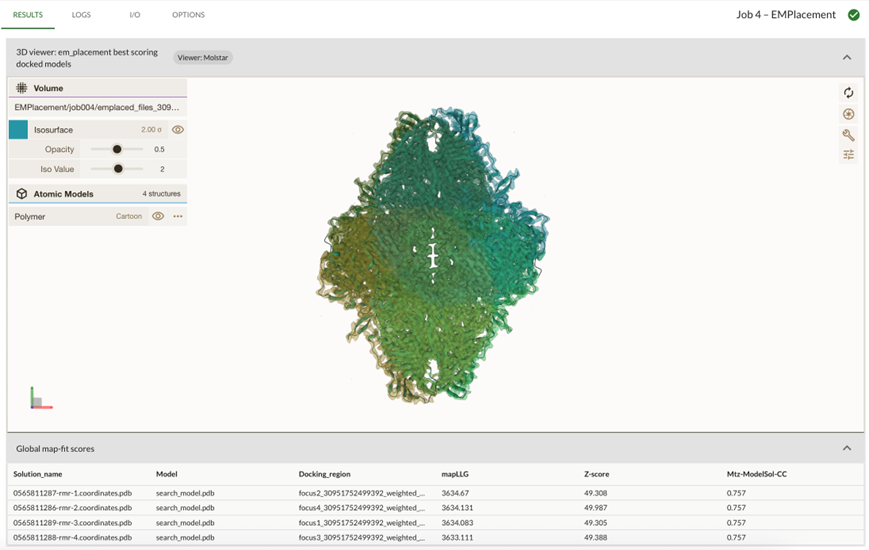
The key metric here is the mapLLG score, this is the log likelihood gain. The likelihood explains the probability of a data set given a model. The log likelihood gain explains the difference between the logarithm of likelihood for a tested model and an uninformative model.
A mapLLG score of more than 60 usually indicates that the model fit is correct.
If you run em_placement with the map in the wrong handedness you will get a score of around <54 (in this dataset) which indicates something is wrong, a visual inspection will confirm and show a poor fit.
The tutorial data and AlphaFold model are very good in this case, and you will see scores of >3000. A quick visual inspection shows a good looking fit in all regions.
Note the model with the highest mapLLG score (docked_model1.pdb in this case), we will use that in later steps.
2.2. Checking the handedness#
Warning
If you are using the pre-calculated maps from the Tutorial5.0 project, the map handedness is already correct (mapLLG > 3000) and this section is optional and can be skipped.
However, if you continued from your own SPA tutorial project (or are working on your own data) and obtained a low mapLLG score (< 60) and a poor visual fit, your map almost certainly has inverted handedness and you must flip your maps before continuing.
It is not usually possible to determine absolute handedness from a data set without tilting the microscope stage. The de novo reconstruction algorithm in the Initial Model job therefore has a 50% chance of producing a map in the incorrect hand (and every map that follows in subsequent jobs inherits that handedness). Trying to fit an atomic model (or inspecting the hand of α-helices at high resolution) is a reliable way to check this.
Examine the results of the EMPlacement job. If the model doesn’t look like it fits well in the map and the mapLLG score is low, the map’s handedness is likely inverted.
To help visualise the model in the map you can adjust the Opacity and Iso Value (a.k.a. contour value) from the Volume menu in the Mol* graphical viewer in the RESULTS tab.
The Flip map handedness job in Map Utilities can be used to flip the maps if needed. You will need to run this for all maps used in downstream processing. Add additional maps to the input with the + button next to the file inputs:
JOB: Flip map handedness
Input map:: PostProcess/job030/postprocess.mrc
PostProcess/job030/postprocess_masked.mrc
Refine3D/job029/run_half1_class001_unfil.mrc
Refine3D/job029/run_half2_class001_unfil.mrc
Refine3D/job029/run_class001.mrc

HEADER: Queue submission options
DEFAULT: Submit to queue?:: No
DISABLED: Queue name:: openmpi
DISABLED: Queue submit command:: qsub
DISABLED: Standard submission script::
DISABLED: Minimum dedicated cores per node::
Run the Flip map handedness job, then clone the previous EMPlacement job by clicking on its “three dots” icon and selecting Clone job. Change Input half map 1 and Input half map 2 to the flipped half maps (Flip/jobXXX/run_half1_class001_unfil_flipped.mrc and Flip/jobXXX/run_half2_class001_unfil_flipped.mrc), run it, and compare the visual fit and mapLLG scores. If your original maps were inverted, remember to use the flipped maps (Flip/jobXXX/*_flipped.mrc) in all subsequent chapters of this tutorial.